Dominions II: The Ascension Wars is one of the best fantasy strategy games to come out in the past five years. It's better than Age of Wonders II, and much better than Heroes of Might & Magic IV. You'd probably have to go back to Heroes of Might & Magic III (1999) or Warlords III: Darklords Rising (1998) to find a game that has as much strategy, flow, and atmosphere as this. Unfortunately, a combination of the game system and the interface make this one of the most opaque games ever produced: beginners look at it, click some buttons, lose a few battles, and back away slowly. The game has a quick-start guide, but that only gets you started and doesn't explain what the basic issues are. If you've purchased this awesome game, but are completely lost, follow the quick-start and read this strategy summary. The interface may be a bit baroque, but that's the price of progress. Strategy progress!
[NOTE: What follows below is a walkthrough which can be used both by people who have just downloaded the demo, and those who have purchased the full game but aren’t sure where to start. As you read through the walkthrough, there will be some sections that briefly outline the gameplay issues involved, and at the end will be a section on creating a pretender god and about general game strategy.]
If you want to just read a basic strategy article without all the walkthrough stuff, click here.
THE ISSUES
Dominions II is about one thing: your god and people worshipping your god. I guess that’s kind of two things. Worship of your god is represented by "dominion," which is calculated on a per-province basis and is show graphically by the candle icons. A tall white candle means your dominion is high, while a tall black candle means someone else's dominion is. If you don't have any dominion in any province, you lose the game immediately. In order to spread your dominion, you have to conquer at least some provinces. In order to generate income and build armies, you have to conquer a lot of provinces. So while the game is about going to church, it's also about killing people - at least those people who don't go to your church.
When you create your "Pretender God," which I guess is you in the game if you're into that sort of make-believe, you determine a whole bunch of things, including your pretender's dominion score. The higher this number, the stronger your dominion is, so the faster it spreads, the harder it for other gods to un-spread it. This is important because if you don't have a strong dominion, you'll need to do other things to spread the word of your god.
There are a lot of things to decide when you create a pretender. Since this is one of the most important things in the game, it's pointless to explain what choices to make without explaining what they're based on. So we'll wait until the end to systematically go through god creation. Believe me, it will be worth it.
For now, just download this file: walkthru.zip. Make a new folder in your Dominions 2 (or Dominions 2 demo) folder called “Walkthru.” Unzip the two files (ftherlnd and jotun.trn) into your /Walkthru folder that you just created. Then launch the game and choose “Play Existing Game” and select “Walkthrough.” Hit “Play Game” and then select “Jotunheim (turn nbr 1).” Exit out of the first-turn messages. (They’re not important.) Here we go.
You can play the game and read this walkthru at the same time by playing Dominions 2 in a window. Just hit Alt+Enter anytime after starting the game.

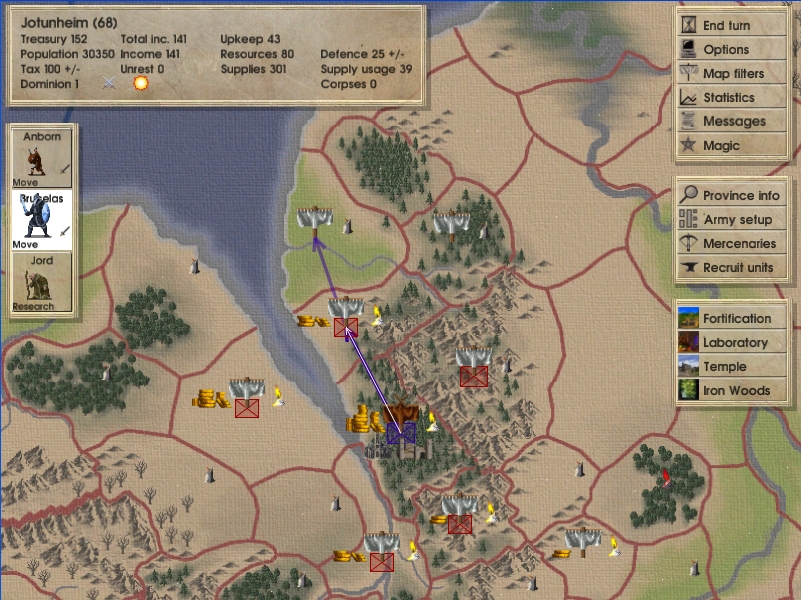
You should be looking at something like this. The brown banner designates your province, Jotunheim. Since it’s active, you get its statistics in the upper left box. Don’t worry about all the numbers now. Notice how the map is divided into provinces by red lines. If you right-click on the white banners in the adjacent provinces, you’ll get their names, your dominion in that province (zero) but little else. Right-click on the white banner in the province to the northwest (Resting Heights) of your home. Now left-click on the “Province info” button on the right side of the screen. “We have no reports on the enemy forces in this province.” Bah.
Movement in Dominions II is done from province to province. The sea spaces are also provinces, but can’t be entered by non-amphibious/aquatic units unless they have magical help. Units can move one province if they’re entering enemy territory, or multiple provinces if they are fast enough and are only moving through friendly provinces. Armies can only move with commanders. Commanders can also move alone.
On the left side are your three commanders in this province. If you right-click on them, you get their stats. The middle one is named Halvdan, and he’s a scout. His job is to find out what’s happening in other provinces. So let’s put him to work.
Left-click on Halvdan so that his box turns white. Now left-click on the province of Resting Heights. A white arrow should point from your home to that province, and Halvdan should now have “Sneak” under his name. He’s sneaking! The arrows will always indicate units which have been ordered to move. Scouts can sneak, which means that even if they enter a province with enemy units in it, they won’t initiate combat. (They can be ordered to move normally by holding down Ctrl while clicking in the destination province, but most of the time you won’t want to do this.)
The bottom commander is actually your pretender god. He’s pretty tough. He is good at combat, but for now, he needs to hang out and do some homework. Right-click on his icon and note these icons:

The blue icon indicates his water magic skill (8), the hammer shows his earth magic skill (4), and the stack of books indicates his research ability (14). Since your pretender is your only commander with any research ability right now, it’s important to start researching spells. Click on the word “Defend” at the bottom of his commander icon. A “Change order” screen should appear. Find the word “Research” in the list and click on it. You’ll be returned to the main screen and your pretender is set to research. But what is he researching? Click on the “Laboratory” button on the right side of the screen. You’ll see this:
Click on the leftmost box (the book). You’ll see the main research screen.
There should be a green line in the left progress bar of the “Evocation” school. If not, left click in this bar until you see this:
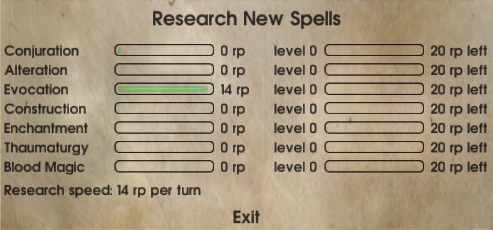
Your pretender has 14 research points to spend per turn. You’ve allocated all of them to Evocation. If you wanted, you could have split them between multiple schools – just left-click in the progress bars on the left. In fact, go ahead and try that out. Just make sure you put all the points back into Evocation before you exit this screen.
A time-out to talk about magic: The magic system is Dominions II is pretty straightforward as long as you understand a couple simple concepts. Magic is divided into paths and schools. The paths are things like air, water, earth, fire, death, nature, and some other things you've probably seen in a lot of movie documentaries about magic. You gain skill in magic paths by purchasing levels at the beginning of the game (during god creation). Your pretender god is a level 8 water mage and a level 4 earth mage, as we saw above.
Magic schools are something else. These are things like, conjuration, evocation, alteration, and other things that make perfect sense in fantasy game logic. Instead of purchasing these skills at the outset, you have to research them throughout the game. When you research a certain level in a school, you get to cast the spells from that school that belong to a path in which you have sufficient skill.
For example: Cold Blast is in the second level of the Evocation school. It's a second-level Water path spell. If you're at least a level 2 Water mage, and you accumulate enough research to unlock Evocation 2, you get to cast Cold Blast. End of story.
Acid Bolt is in the third level of the Evocation school. It's a second-level Water path spell and a first-level Fire path spell. If you research up to Evocation 3, you must be at least both a second-level Water mage and a first-level Fire mage to cast this. If not, sorry. There are plenty of other cool spells in Evocation 3. If you meet the path requirements, you get to cast them once you research that level of Evocation. Since our pretender god has no Fire skill, he will not be able to cast Acid Bolt, even if we research Evocation 3. This would not prevent some other mage, who met the Water 2, Fire 1 requirements for Acid Bolt, from being able to cast this spell. But we don’t have any Fire mages right now.
It’s time to build an army. So let’s talk about this. You’ll need to learn about income, resources, and armies.
Income & Resources
Gold builds buildings. Gold plus resources builds troops. Gold accumulates in your treasury. Resources don't accumulate, and can only be used in the province that they are produced in. Thus, if a province generates 5 resources per turn, it will only have 5 resources available each turn. If you don’t use them, they go away at the end of the turn. There is a role-playing reason for this in the manual, like that there are only so many forges and that blacksmiths can only work so fast. Whatever. It's a good device and is absolutely central to the game’s strategy.
While you won't be able to determine how much income or how many resources a given province will produce until you've actually occupied it, you can generally guess by the type of terrain in that province. Farmlands give good income but poor resources, while mountains/forest are the opposite.
Armies
The complex theological underpinnings of Dominions II notwithstanding, this is a fantasy strategy game. The whole point of a fantasy strategy game is to build magical armies to take over the make-believe world (which always ends in -ia, like Urgaia or Britannia or Erathia), and that's also the point here. The fact that here you're on a religious crusade just makes it more philosophical.
As we learned above, armies are produced by gold and resources. Gold is collected from all provinces and pooled. Resources are not. Different provinces produce different units. Units have widely varying resource costs, which are greater for those units (heavy cavalry, armored troops) with more equipment.
So let’s go back to the main map, right-click on your home province if it isn’t selected, and left-click on the “Recruit armies” button on the right side. You should see this screen:
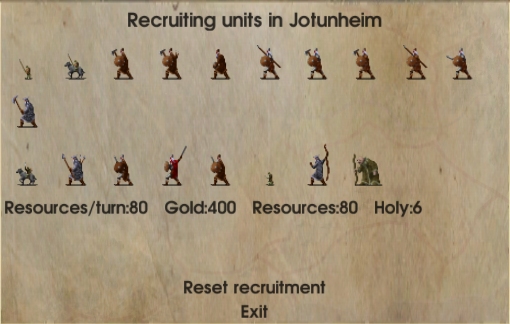
These are your Jotun home recruits. They are specific to your race, and can only be recruited here because this province contains a fortress. Right-click on some of the units and check out their stats. If you left-click on a unit, and you have enough gold and resources left to recruit that unit, it gets added to the recruit queue immediately below the text. If you click on the queue, you can remove units.
We need someone to continue our research while our pretender leads his army into combat. Click on the Gygja – she has a research skill of 7. Then click on the second unit from the right in the top row (Jotun Huskarl). Click on it three times total. You’ve now used up all but one of your resources. The remaining 45 gold will carry over to next turn. These four units (Gygja plus three huskarls) will appear at the beginning on next turn.
So that’s it. Exit to the main screen, and hit “End turn.” At the next screen, click on “Host.” If you click on “Jotunheim (turn nbr 1)” again, you’ll be given the choice of going back and continuing to issue orders, or clearing your turn 1 orders and starting again. When you hit “Host,” all orders are resolved simultaneously. If you were playing a multiplayer game, you would hit “Host” when all players had submitted their orders. This makes Dominions II a great game for both play-by-email and online hosting, because you don’t have to do turns in sequence. Playing with seven players doesn’t take substantially longer than playing with three.
Turn 2
All turns are resolved simultaneously. There wasn’t any combat this turn, but our spy has moved to the province of Resting Heights. Right-click on the province to select it, and then left-click on “Province info” (or hit keyboard shortcut i). The banner is still white (meaning it is owned by Independents) but now Halvdan is hiding here and sending back reports. It looks like this province pretty lightly defended – just militias and archers. So we need to go invade it.
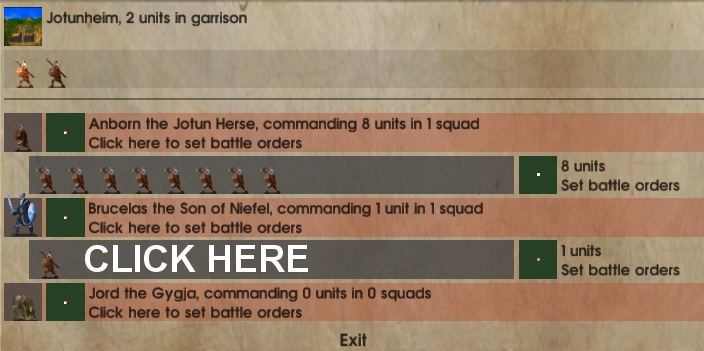
Select your home province and click on “Army setup.” You’ll see a screen with three three commanders:
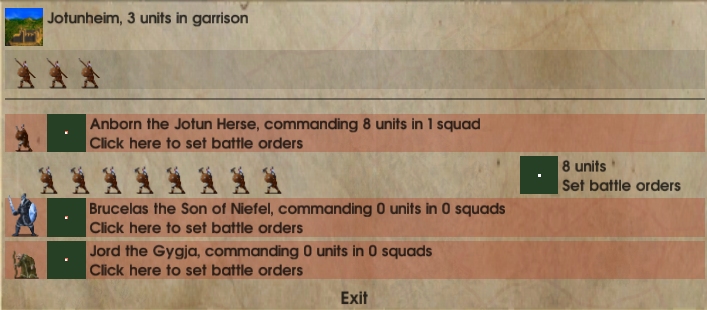 The units you recruited last turn are at the top, unassigned to any commander. (the Gygja is immediately placed in the commander list.) Your initial army is assigned to Anborn, which is how it started the game. Let’s assign the three new units to your pretender god.
Left-click on the first one of your units in the top row. It will become selected. Then click on your pretender god’s icon. A new squad will open up, and the unit will move into it. If you click on the next unassigned unit and click on the pretender god again, a second squad will open up under his command, and you will see two separate squads, each with one unit, commanded by your pretender god. We don’t want this. Instead, first click on the second unassigned unit, and then click on the grey shaded area next to the unit you just assigned to your pretender.
Do that for the last unassigned unit, at which point you should have two squads led by two different commanders. You could actually have assigned all the units to one commander, since commanders are limited by their leadership rating, and whereas Anborn’s leadership rating is 25, you only have 11 units total.
(You can actually select multiple units by Shift-selecting them, or double-click a unit in a squad or garrison to select all units of that type in the squad or garrison. Those are handy when manipulating large stacks.)
So what does all this mean, anyway? What do the squads do? That brings us to combat.
Combat
I could probably write an entire strategy article on combat, and maybe I will someday when my Dominions II obsession puts me in the hospital. As you probably found out when you tried to play the game without reading the manual, you can’t directly control your units on the tactical map. Instead, you give them orders beforehand, and then they go and fight and maybe they win and maybe they don’t but in the end you tell them "good game!" and that "we'll get 'em next time." If they’re not all dead.
Put very simply, combat works like this:
● A random number is generated and added to the attacker’s Attack value.
● A random number is generated and added to the defender’s Defense value.
● If the attacker’s value is higher, it hits.
If there is a hit, the damage is calculated.
● A random number is generated and added to the attacker’s Strength and weapon Damage values.
● A random number is generated and added to the defender’s Protection value.
● The difference (if positive) is subtracted from the defender’s hit points.
There are a lot of details to this process. Units with long weapons can “Repel” enemy units and negate their attacks. Some units have multiple attacks. There are lots of special attacks, like poison and paralysis. There are ranged attacks. Some units have mind attacks. And then there are all the spells.
There isn’t much point to detailing all the crazy things that can happen in combat, because it’s almost impossible to be comprehensive. That’s beyond the scope of this strategy article. The important thing to know is that the object is not necessarily to kill all the opposing enemy units, but simply to get them to rout. The army first army to have all of its units rout or die loses the battle.
Morale & Rout
Units are checked for rout on a per-squad basis. The more units that are in a squad, the more casualties that squad can take before routing. All of a side’s units will rout as soon as their last commander is killed. Units with higher morale are less affected by routing units than those with low morale. An army will rout when all of its commanders are dead.
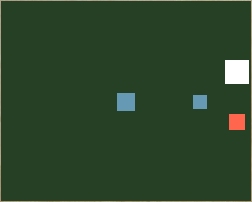
Back to our walkthough game. Click on “Army setup” again and note the little green boxes to the right of each commander, and to the right of each squad. This is where you position your units on the battle field. Click on the green box to the right of your largest squad (just to the left of the words “8 units” and “Set battle orders”). You’ll get a new window which says “Position squad” and a single white box in the middle. Click towards the right side of the green field, which represents the tactical combat map. The white box will move to where you clicked, and there will be a blue box left behind.
These boxes represent squads and commanders. Orange boxes represent the squads, blue boxes are commanders, and white is the color of the current unit (squad or commander) that is being adjusted. It may take a little while to get used to this kind of depiction. The important thing to remember is that you want to spread your units out, and group them by capability much as you would in any other fantasy wargame. You don’t want archers out in front of your heavy infantry, since that would leave them exposed to melee. You want fast-moving cavalry on the flanks to get behind the enemy. These kinds of simple rules are sufficient for learning the system. Just as important as individual tactics are proper unit combinations, and augmenting your troops with mages who can cast effective spells. This is the kind of thing you’ll learn as you get into Dominions II.
Initially, all of your squads and commanders are stacked up in the middle. Move the two squads to the front, put Anborn behind them, and leave your pretender in the middle. The final setup should look something like this (don’t worry about which box is white – that just indicates which squad or unit is currently selected:
You can also set orders for your units, such as attack closest enemy, attack rearmost enemies, attack archers, and so forth. These can be accessed by clicking on the words “Set battle orders” in the army setup screen. For now, don’t worry about these – let the computer do it.
Now exit to the main screen, select Anborn and move him to Resting Heights by clicking on that province while Anborn is selected. Do the same for your pretender. Note that their orders change to “Move” and arrows point from your province to Resting Heights. You’re set to invade your first province. Let’s take care of the rest of the things we need to consider.
Now that our pretender is moving, he can’t do research. Fortunately, our new commander can. Click on the Gygja where it says “Defend” and change the order to research, just like you did on turn 1 with your pretender. Then click on the Laboratory button, and on the leftmost button to access research. You should see this:
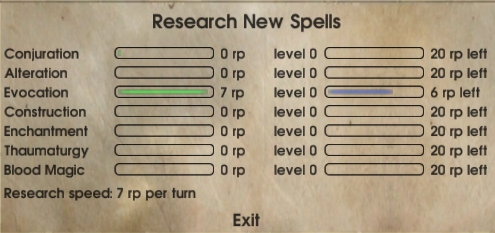
Note the blue progress bar on the right side of the Evocation line. That is the 14 points of research your pretender did last turn. Your Gygja does 7 research per turn. You only have 6 research points left in the Evocation school to reach level 1. You will finish Evocation 1 this turn, and get 1 point of credit towards Evocation 2. You could try and split your research so that you did 6 points towards Evocation this turn and 1 point towards something else, but for some reason, you can only split it 5/2 or worse. That’s probably for realism reasons. Who knows. Leave things as they are so that you have enough research points to finish Evocation this turn.
Don’t forget about Halvdan, your scout. Move him directly north to Glanis. What you’re trying to do is get information on provinces you’re likely to attack soon. If you win the battle in Resting Heights (which you should) you’ll be poised to expand into the fertile farmland to the north. Once you have issued all your movement orders, you should see something like this:
You need to recruit some new units as well. You don’t have any priests yet, so this is a good time to recruit one. Click on the Jotun Jarl (fourth from the left in the commander row) in the “Recruit units” screen. That will use up most of your gold. End the turn and host.
Turn 3
Before, we weren’t too worried about the messages because they were just background info. But we expected a battle in Resting Heights, and we got one. You can either click on View Battle, or just get the results by clicking on the part of the message that says “There was a battle in Resting Heights.” You almost certainly won, so watch the battle just to see how things work out. Your units are giants, meaning they have much more strength and hit points compared to the “average” unit. Ten giants took out ten heavy infantry and heavy cavalry without breaking a sweat. Notice also how your pretender was casting spells to support your troops. As you get more familiar with the game, you’ll want to make sure you have the right spells available to make the biggest difference in battle. That’s what research is about.
With this kind of power, we don’t have to worry too much about the report from Halvdan in Glanis, which shows that we’ll be heavily outnumbered by militia. That’s an easy battle for us, so we need to start thinking about general strategy.
Note that the province directly north of Resting Heights (Glanis) has a deeper green color which denotes farmlands. Farmlands don’t generate many resources, but they do generate gold income. It would be nice to get some of this income for Jotunheim! Also, note that we’re now receiving 110 resources in Jotunheim instead of 80, as we were before. This is because of Jotunheim’s fortress.
Fortresses
Fortresses do two things: they increase the supply value of nearby provinces, and they "collect" resources from adjacent provinces based on the fortress’ "admin" value (determined when you chose which type of fortress your race would use, during god selection). This means that if your fortress has an admin value of 40, then 40% of the resources in each of the adjacent provinces will be collected and will become available in the province with the fortress. In addition, only half of a province’s available resources can be produced unless that province has a fortress. So the only provinces that will be producing at "full capacity" will be the ones with fortresses in them. This makes fortresses the focal point of your military-industrial complex.
Fortresses also do a third thing, which is to provide sanctuary for besieged armies, but that's obvious because of fantasy realism.
The effect of fortresses on resources is one of the most important things in the game.
For example: let's say a province generates 25 resources. Let's also say that you have built a fortress in the province immediately to the south, and another one in the province immediately to the north. Furthermore, let's say your god's fortresses have an admin value of 40, meaning that 40% of the resources in each adjacent province are collected by each fortress. In the above example, 40% of the resources in our 25-point province will go to the southern fortress, and another 40% will go to the northern fortress. Since 10 is 40% of 25, that 25-point province will lose 10 points to the northern fortress, and 10 more to the southern fortress. A total of 20 points are being collected, leaving only 5 resources in that province for production each turn. These 20 points aren't lost - they're simply moved elsewhere. But building your fortresses in the wrong place can cause big problems. The reason for this becomes obvious below.
You can see how building a fortress in the wrong province can cause problems. Let’s say that a province generates some high-resource units. Let's also say that, like in the example in the fortress section above, you've built a couple of fortresses (or even one fortress) adjacent to this province. What will probably happen is that the forts will end up taking so many resources out of this province that you won't even be able to build a single unit here. If you play a race that depends on independents for its “heavy” units, you've just wasted a province and probably a fortress. So be careful where you build fortresses - while it may not seem so bad to be able to build 20 light infantry per turn, it will be probably be better in the end to build three heavy cav.
This is actually only a problem for some races, because usually, a fortress will allow you to recruit your native units in that province. However, this is not the case for land fortresses built by amphibious races, so planning where your fortresses are going to go is always a good idea.
You can actually put an expensive unit in a province’s build queue, even if it takes the resource count negative. The unit will then be built over several turns. But if you’ve reduced production in a rich province to this method by injudicious placement of fortresses, you’ve made a mistake.
So that’s the story with fortresses. Note how this game is called Dominions, but we haven’t talked about dominion since the first page?
Dominion
As was stated at the beginning, your dominion is a measure of your religious influence. Dominion is spread by five things: priests, prophets, temples, your capital city, and your god. Priests, prophets, and your god are units. Temples are buildings. Just like in real life.
Your god spreads dominion just by being wherever he is. The same goes for your prophet (you can only have one at a time) and your temples. Priests have to be given an order (just like Move or Research) to “Preach the Teachings of God” in order to raise dominion, and the dominion is raised only in the province they are preaching in. If there is a temple in the province, the preaching has increased effect. So to reiterate: dominion spreads outward from your temples, prophet, god, and capital. (This spread can be slow.) Priests can preach in a province, and raise the dominion in that province only.
Take a look at the main map. Notice all the little lit candles in provinces near your capital province of Jotunheim? If you right-click on any of these provinces and look in the stats box, you’ll see that they all have positive dominion values. Your dominion is growing in these provinces because it is spreading from your capital and your pretender. If you right-click on your pretender, and then click on his hit points, you’ll see he’s actually getting a dominion bonus. If he were in a province with strong enemy dominion, his hit points would be reduced. Apparently, a god’s hit points depend at least to some extent on how much people think he is a god. So if you don’t believe in God, God has fewer hit points. Something to keep in mind.
We recruited a priest (the Jotun Jarl) last turn, so he should be in our home province now. A priest can build temples, and preach the teachings of the pretender god. Priests are essential to spreading and maintaining dominion. Remember, you’re not the only god out there. Other gods also spread dominion, and if you are facing one that happens to do so better than yours, you need to be able to fight it.
Temples are built in one turn and cost 200 gold. For the sake of this tutorial, we’re going to build a temple soon. Select your Jotun Jarl in Jotunheim and move him to Resting Heights.
We also have our army in Resting Heights. Let’s take Glanis for the gold it produces. Move both Anborn and your pretender to Glanis (directly north).
Don’t recruit any units this turn – we need to save some gold for our upcoming construction festival. Move Halvdan northeast, to Glade Woods.
Your Gygja should still be doing research, and you should have gotten a message than you had successfully completed your Evocation research. You’re now Evocation level 1, and your pretender should be able to cast the new spells Slime and Cold Bolt. Awesome. Switch your Gygja’s research to Conjuration. There are some cool summoning spells in that line that we want. Hit “End turn” and “Host” again.
Turn 4
Did you capture Glanis? You had better have. Note the big “pile of coins” icon – this means that Glanis produces a lot of income, just as we suspected. Halvdan’s report from Glade Woods should indicate that it’s defended by militias. Hah! What a joke. Let’s destroy them.
Move your pretender and Anborn to Glade Woods. Move your Jarl from Resting Heights to Glanis. Move Halvdan the scout to Dendra Nigra, which is south of Glade Woods. Again, don’t recruit anyone – we need the money.
Turn 5
Now you should be in control of Glade Woods. This is easy, isn’t it? Transfer your squad from Anborn to your pretender in the “Army setup” screen by double-clicking on one of the units in the squad. They are all the same, so this will select all of them. Then click on your pretender. This should create a new squad and place all of the Jotun Axemen in it. Anborn should have no units under his command. That’s fine, because your pretender is getting out of here, while Anborn is going to build a fortress.
Click on the word “Defend” on Anborn’s icon in the main map screen, and change his order to “Construct building.” Since he is not a priest (who can build temples) or mage (who can build labs) he has only one choice: build fortress. Click on it. Now move your pretender and his army into Resting Heights (the province south of Glanis, just north of your home province). Note that you can move two provinces, because all the provinces you’re moving to/from/through are under your control.
Move your Jarl from Glanis into Glade Woods. He’s going to be building something here as well, next turn. Move Halvdan the scout from Dendra Nigra to The Second Woods (directly south).
End turn, host.
Turn 6
Where is your fortress? It’s still being built – notice how Anborn is still building? This fortress will take three turns to construct. While you do this, order your Jarl (who has now joined Anborn in Glade Woods) to build a temple. Click on Construct Building. Note how you have the choice to build a temple. This is because your Jarl is a priest. Click on Build temple. That costs 200 gold. Now you can see why we were saving up gold the past few turns.
Halvdan’s report from The Second Woods is pretty promising. Let’s send our army under the command of our pretender into The Second Woods to capture it. Note how even though you had to transfer the squad from Anborn to your pretender last turn, the game remembered the squad’s setup on the battlefield. (Click on “Army setup” to find this out.) So all you need to do is give your pretender the order to move into The Second Woods. Do it.
Because we’re spending so much money on buildings, we’re not recruiting any units. That’s ok for now.
Lastly, note that your Gygja has finished researching Conjuration this turn. Since the spells we want are all Conjuration level 2, and we’re only at level 1, keep her assigned to Conjuration research.
Move Halvdan the scout to Gryphon Spires, which is the province that is directly south of Jotunheim.
End turn, host.
Turn 7
Once again, your combat should have been successful. You’re now collecting even more resources in Jotunheim, your income is increasing, and your priest just built a temple in Glade Woods. It’s time to take stock of the situation. The map should look something like this:

There are five AI races in this game besides you. There is obviously nobody in the northeast corner of the map, or you would have found them by now. This means you can treat this as your backyard for the time being.
Send Halvdan the scout to DwoAna, which is directly west of the province he’s currently in.
Your Jarl up in Glade Woods could preach the teachings of god to raise your dominion in that province. However, you already have a temple there, and your dominion is rising in that area anyway, and preaching only affects a single province. So that’s not a good use of his time. Instead, move him south to Resting Heights, because he’s going to come pick up some troops in Jotunheim. We need to form another army.
We haven’t talked about magic crystals, but this is a good time to mention them. We have a high-level water mage, but if you go to Jotunheim and click on “Laboratory” and then on the second-from-right box you’ll notice you don’t have any water gems, and aren’t collecting any, either. That sucks. This is because you don’t have a magic site that provides that kind of gem. If you exit to the main map and click on the Iron Woods button (while the province of Jotunheim is selected) you’ll see that this is a magic site that provides 2 death gems, 2 nature gems, and one astral gem per turn. This is somewhat helpful, since our Gygjas are nature/death mages, but we really want to enable our pretender to cast some high-level water/earth rituals. So we need to search for magic sites.
Magic sites
Magic sites provide gems which enable you to cast rituals. Not all spells are rituals – remember the spells your pretender was casting in combat? Those didn’t require any gems. But some do, and you can find out the requirements by clicking on the spell in the research screen (or check the manual if you have the full game – all spells are listed there).
Magic sites can be easy to find or hard to find. There are four levels of difficulty, and the chance of success depends on the mage skill of the commander searching for it.
Let’s see if there are any magic sites in The Second Forest. Click on your pretender and change his order to “search for magic sites.”
Recruit as many Jotun Spearmen in Jotunheim as you can. These are great infantry units and will form the basis for a new army.
The rest of the game
From this point on your should be able to continue with this game, or start a new game on your own. Whatever you do, you should keep the following things in mind:
Your first battles have been against independent units defending their home provinces, but eventually you'll be up against enemy nations. Dominions II has no diplomacy (it's gods fighting - they're not about to start combining religions) but sometimes the AI will leave you alone if you leave it alone. If it sends you a message that it's declaring war on you, though, feel free to go kick its ass. Find its nearest fortress, build an army, and go besiege it. Taking out a fortress removes a huge recruiting center, and you get to use the enemy fortress for yourself! It's very excellent.
Once you have a reasonable empire, there are more things you'll have to worry about. Primarily, you need to worry about the possibility of enemy armies taking over your provinces. The best way to avoid this is to position your armies so that there are only a couple of entryways into your empire, and those are covered by armies. Once an enemy gets behind your forces, things get interesting (and frustrating) because with the simultaneous movement system, you're going to end up guessing where the enemy is going next turn. The best way to deal with this is to minimize the number of provinces he can move to. Keep a front line of armies adjacent to his territories. If you're attacking him, he's probably defending and not thinking about attacking your territories. If pressed, concentrate your defense on your fortresses. You can hold out there while you recruit armies elsewhere to come and help.
Scroll through the different schools of magic. Click on the spells that are in your path(s). Do they look useful? Arcane Masonry (Construction level 5 / Earth level 3) is a pretty sweet spell, but if you already have strong fortresses, and aren't in danger of being besieged any time soon, you don't need it right now. Find something else to research. Are you an all-fire mage? Are you currently trying to research Thaumaturgy level 6? If so, in the words of Master Shake, “Why are you doing it??” There are no Fire spells that are made available by Thaumaturgy 6, and the only Fire spell above level 5 in that school (Purgatory, level 7) only works against undead. Do you have urgent mummy problems? If not, go find some other books to read.
We haven't even talked about changing taxation rates to put down unrest, organizing local defense, fighting underwater, patrolling, or many of the other cool things in this game. That's something you should explore on your own. Dominions II has a lot of stuff going on, but much of it only makes sense once you've played and experienced it.
I expect to add further installments to this guide. If you have an idea or correction, email dominions2@maladjustite.com and put "Dominions" in the subject line.
Lastly, here is a step-by-step guide to creating a pretender god. This is the same god we’ve been using in this walkthrough. I’ve outlined the logic for creating this kind of god, so you can follow along if you want.
THE PRETENDER GOD
Here's where we get to build a pretender god. Remember all of the stuff from this article, because this is like a test. We're going to use Jotunheim as an example because Vikings are Scandinavian and kick ass.
● Select physical form
You get a lot of choices here. I like the Son of Niefel because he's tough, looks like a Viking, and has a lot of hit points and high leadership, which makes him good for fighting which is what Vikings do. The downside is that he only starts out with Water 2 and Dominion 2, but we can raise those later, and he comes at a very reasonable 50 points. That gives us 450 for the rest of the creation process.
● Enter the name of your god
This is up to you. Since this is a fantasy game, names should sound as stupid and faerie-like as possible. Brucelas is always a good choice. This costs no points, so we still have 450 left.
● Magic
This is a tough one. It's a good idea to have at least two paths of magic, because you will probably have more than one source of magic crystals. Because I have some stuff in mind for Brucelas the Viking Son of Niefel, I'm going to go with Water 8 and Earth 4. Notice how much it costs to raise my Water level once I get up above 5. I choose Earth not because it's a particularly good fit with water (it's not, at least in terms of dual-path spells) but because it opens up the Construction school and will let me cast some neat spells with just 4 skills levels in the path. 160 points left.
● Dominion
Ok, here is where stuff starts getting crazy. You can “tilt the scales” in any of several categories, like order/sloth, growth/death, fortune/misfortune. Note that with Jotunheim, tipping the scales in various ways opens up special dominions (or, you can just click on “special dominion” and it will give you a list). You can also change your dominion value here. So much to do!
First, get a plan. Are you going to try and wipe the map out with military conquest, or will you be a bit more sneaky and try to propagate your dominion? Because Jotunheim has very expensive units, it will be almost impossible to create huge Jotun armies. If you combine this with a low dominion, you're going to be hard-pressed to have enough military force to defend all the temples you're going to have to build, with money you won't have because Jotun units are so expensive. So high dominion is a good idea.
Kick dominion up from 2 to 6. Ouch! Only 90 points left. So let's try to get some more points back. We can do this by tilting some of the scale towards the “negative” side, like towards sloth and away from production. Or, in our case, towards turmoil and away from order. This is going to increase the unrest in our provinces, but so be it. One click gets me 40 extra points! And look - a new special dominion opens up! It's called “Restless Worshippers.” It costs 50 points, but its effect is to make my pretender's dominion spread more quickly. With a dominion of 6 and this special power, I'm gonna be one powerful evangelist. I have 80 points left.
● Castle
This is the last selection. Since we're playing Jotunheim, we need a lot of resources to build units, so we need a high admin value. We would also like a high supply value, since our units are giants and use a lot of food. Fortified city looks good: it has the highest admin value (50), one metric assload of supply (500), and a decent defense (100). However, one fortified city costs 5 turns to build and 750 (!) gold. Yikes. Scratch that. No wonder it only costs 80 points. A castle costs the same amount of points, has just slightly less admin (40) and the same defense (100). Unfortunately, it only gives 150 supply, but it only takes three turns to build and requires 450 gold. Much more reasonable. We take that. Zero points left = perfect efficiency!